If you’re struggling with your blog and wondering what on earth it takes to break through the noise and get noticed, keep reading.
Because in this post I’m going to show you exactly how to create a post that:
- Taps into the subscriber lists of people with massive followings
- Quickly build relationships with key influencers in your niche
- Positions you as an expert through the power of association
- Promotes itself and has the potential to go viral
What kind of post am I talking about?
It’s called a ‘roundup’ and it’s very simple.
You just find some experts in your niche and ask them a question, the shorter the better.
Roundups have the potential to generate huge traffic to your website and massive social media sharing.
But the real magic of roundups is the relationships that you form with key Influencers in your niche. And it’s relationships with key players in your niche that will take your blog to the next level.
There are six key steps in creating a successful roundup post and I’ll take you through them step-by-step:
- Deciding on the Question
- Finding the Experts
- Finding Email Addresses
- Doing the Outreach
- Writing the Article
- Promoting the Article

1. Deciding on the Question
The question you ask your experts is the most important aspect of a roundup post – it will literally make or break your roundup.
Why is that?
Firstly, the question you ask must be one that your experts want to answer. Influencers and experts are busy people. If they can’t answer your question in about 5 to 10 minutes, they’ll simply pass – they don’t have the time.
Also, if you ask a question they’ve already been asked in half a dozen previous roundups, they may not bother to respond.
Secondly, the question you ask your experts must be one that your target audience wants answered.
So when you write a roundup post you actually have two audiences – experts and target audience – and they both need to be motivated by your question.
1.1 Use Your Own Learning Process
If you are a blogger and you have a following, it’s more than likely that you are teaching people how to do things. You may be only one or two steps ahead of your readers (you only need to be one step ahead of someone else in order to help them).
This means that your problems are very likely their problems. So keep a detailed diary of the challenges and problems that you face and overcome as you build your blog.
You can use those challenges and problems as the basis for roundup questions. For example: “What’s you number one list-building technique?” or “What’s your single most important source of traffic?” or “What are the three digital marketing tools you couldn’t do without?”
1.2 Use BuzzSumo to find trending topics
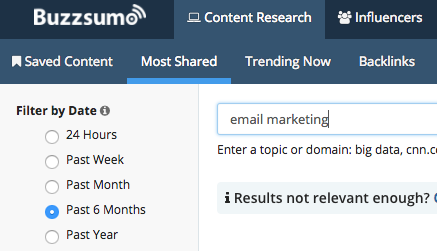
Let’s say your broad topic is ‘email marketing’ but you want to narrow it down to a sub-topic. Go to BuzzSumo and type in ‘email marketing’.
In the left panel, set the filter to ‘last 6 months’ to ensure relevancy:
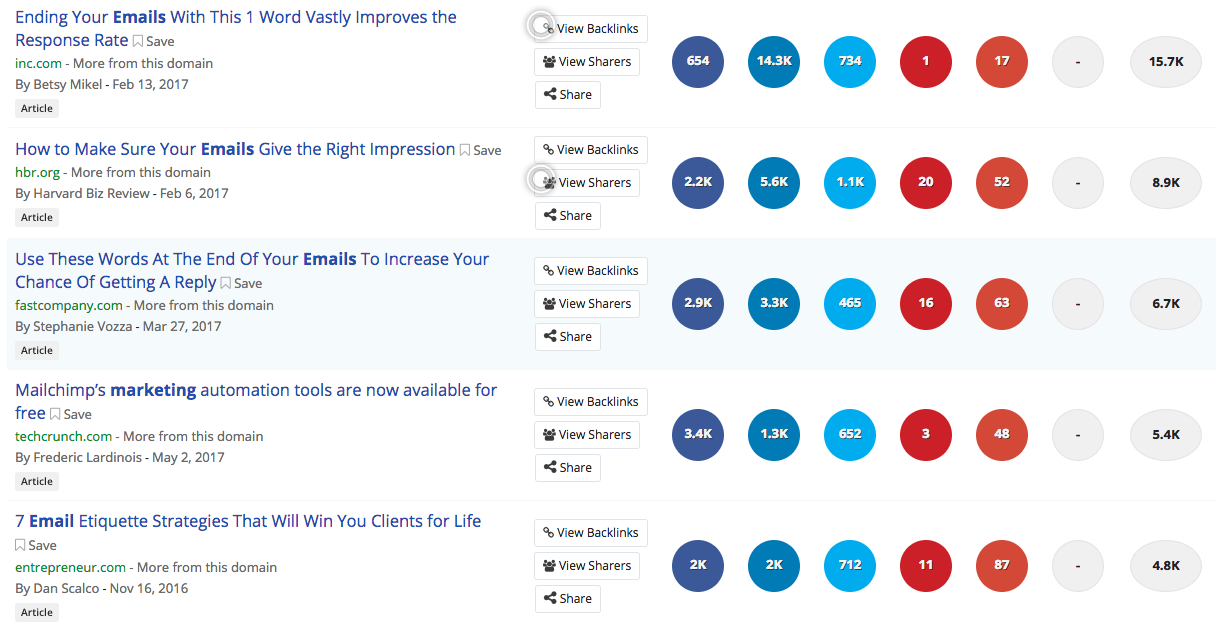
In the top 10 results I can see that ‘email etiquette’ is the trending topic within ‘email marketing’:
I cast my eye over the titles of these articles and bingo! I’ve got the question for my roundup post: “What’s the single most important aspect of email etiquette for a web marketer?”
You can use this method with any upper level topic you can think of:
- auto responder sequences
- collaborative content
- content marketing
- content promotion
- copywriting
- creating graphics for blog posts
- creating infographics
- creating online courses
- creating optin bribes
- finding topics for blog posts
- finding your niche
- finding your tribe
- forum commenting
- guest posting
- influencer marketing
- link building
- list building
- monetizing blogs
- opt-in popups
- podcasting
- sales funnels
- seo
- social media espionage
- wordpress plugins
- writing blog post titles
- writing blog posts
1.3 Be Very Specific
Ask ONE thing only. The more specific your question, the more likely your Influencers and experts will respond.
Avoid vague questions like “what’s your view on guest posting?” Instead ask: “What’s the most valuable guest posting tip you could offer to a novice blogger?”
One way to make a question more specific is to add a date. Instead of asking: “What are the best blog promotion techniques”, ask: “What are the best blog promotion techniques in 2021?”
1.4 Always Indicate the Target Audience
Your experts will find it much easier to respond to your question if you clearly indicate the target audience. It goes back to the previous point – being as specific as you can.
For example, this question is okay, but it doesn’t indicate the target audience: “What’s your single most valuable piece of blogging advice?”
This is the same question, but with the target audience specified: “What’s the single most valuable piece of advice you would give to a first-year blogger?”
The second version is much more likely to get a response from an expert, because it’s more specific.
Not only that, once the article is published it’s more likely to be shared and go viral because it has a very specific audience: first year bloggers.
Here’s another example.
Instead of asking: “What are your best list building techniques?” ask: “What key tip would you give to a first year blogger trying to get their first 1000 subscribers?”
This is an easier question to answer because (a) you’re asking for just one tip, and (b) it’s a tip for first year bloggers who don’t yet have 1000 subscribers.
Remember: the more specific your question, the easier it is to answer, and the more likely it is you’ll get a response.
1.5 Place the Influencer in the Role of Expert
In a recent roundup post I asked: “What’s the single most valuable piece of advice you ever received about succeeding as a blogger?”
But I noticed I wasn’t getting much response.
So I changed the question to: “What’s the single most valuable piece of advice you would give to a first year blogger?”
Immediately I started getting more responses.
The reason? My second question placed the Influencer in the role of an expert helping people with less experience. It works because (a) people want to help others and (b) they want to be seen as experts.
1.6 Avoid questions that will produce similar responses
If you ask: “What is your #1 list building technique?” you can be fairly sure that over half your respondents are going to say a ‘free eBook’ or something to that effect.
That’s not going to result in a very interesting article.
One way to avoid getting similar responses is to ask personal questions such as:
- “What was the biggest mistake you made in your first year of blogging?”
- “How did you get your first 500 subscribers?”
- “How did you make your first $1000 dollars online?”
These kinds of questions are all going to produce unique results because they draw on individual experience.
1.7 Use a Negative Perspective
If you find that your topic has already been done to death, you can always put a twist on it.
Let’s say you want to do a roundup on ‘blog post promotion’ but a quick search on Google shows that it’s been overdone.
You can put a twist on that topic by turning it into a negative and still have a question that sounds original:
- What Are the Most Common Mistakes People make when Promoting Blog Posts?
- What are the Three Most Common Mistakes People make when Promoting Blog Posts
- Why do People Fail with Blog Post Promotion
1.8 Formulas for Asking Questions
Take the topic of your choice and then apply these formulas for coming up with a question for your roundup post:
- If you had only 3 months to ____ what would you focus on?
- What will be the biggest change in ___ over the next 12 months?
- What is the biggest lesson in ¬¬¬___ you ever learned?
- What is the biggest mistake you ever made in ____?
- What’s your best tip for ___?
- What are your 3 favorite tools for ____?
- What is the most creative example of ____ you have ever seen?
- What are the top traits of highly successful ____?
- If you had to start again in ____ what would you do differently?
1.9 Go for a Three-Word Response
The response rate in your outreach process can be quite low, sometimes as low as 20% to 30%.
If you want to increase the response rate, ask an extremely simple question that can literally be answered in three words.
For example:
- Q: What are your three most useful blogging tools?
- A: BuzzSumo, Skitch, Evernote.
It’s so short, you could even use Twitter for the outreach!
1.10 Email Your List
Send out an email to your list asking them: “What’s the one thing frustrating you most in _____”.
Find a topic that your readers are struggling with and you’ve got a winner!
2. Finding the Experts
Finding experts or Influencers in your niche is not difficult. Here are three techniques that work well.
2.1 Use BuzzSumo
Go to BuzzSumo, type in the keyword for your niche, and then click on the ‘Influencer’ tab. In the example below I searched for Influencers in the ‘Content Marketing’ niche.
In the left-side panel check ‘Bloggers’ and ‘Influencers’ and leave the other three boxes unchecked.
In the filter box on the top right of the screen, make sure you have ‘relevancy’ selected:
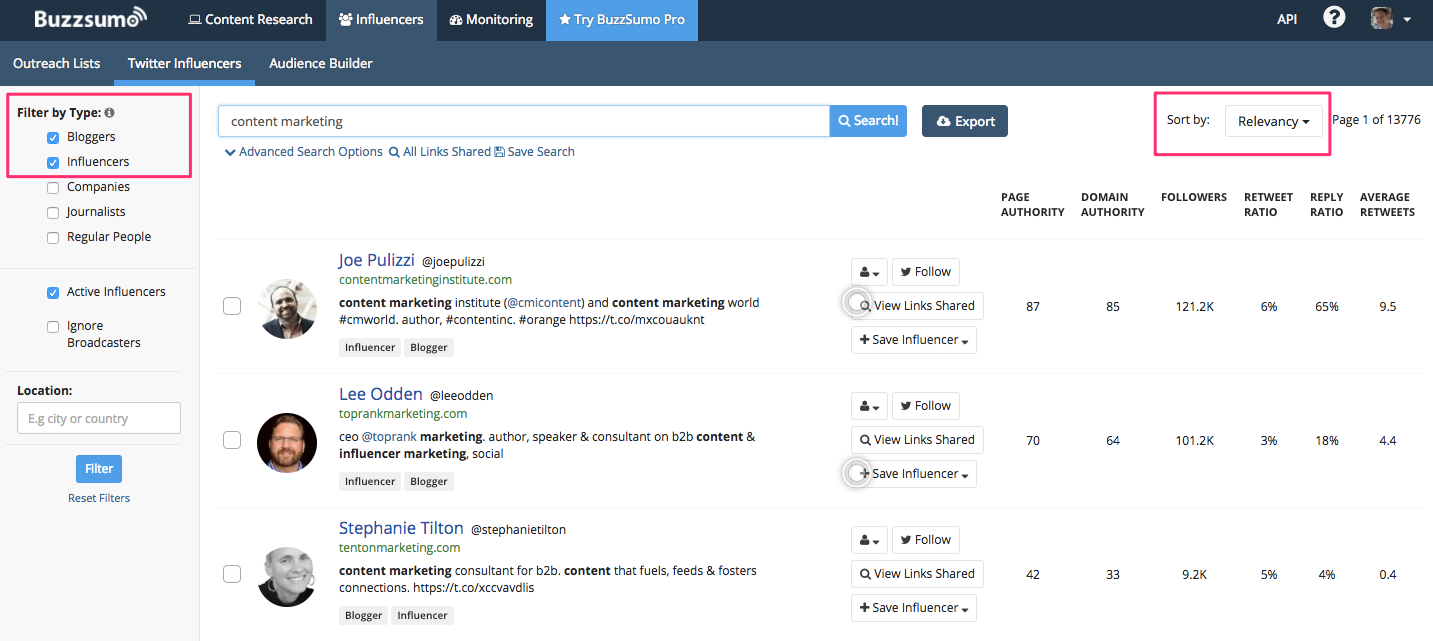
The free version of BuzzSumo will only give you 10 results. However, if you sign up for the free trial, you’ll get access to a fully functioning version for 14 days.
2.2 Use Followerwonk
Followerwonk is a product of Moz and is a paid service. But the free version allows you to find Influencers in your niche.
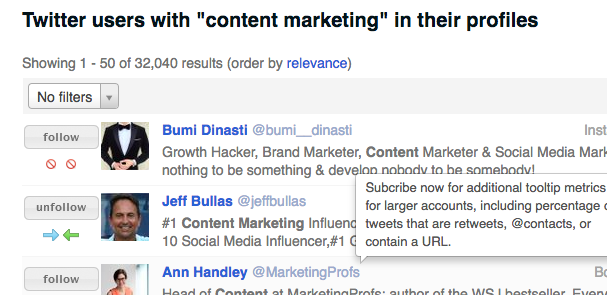
Just go to Followerwonk and click on the ‘Search Bios’ tab (top left).

Then type in the keyword for your niche and click ‘Do It’:
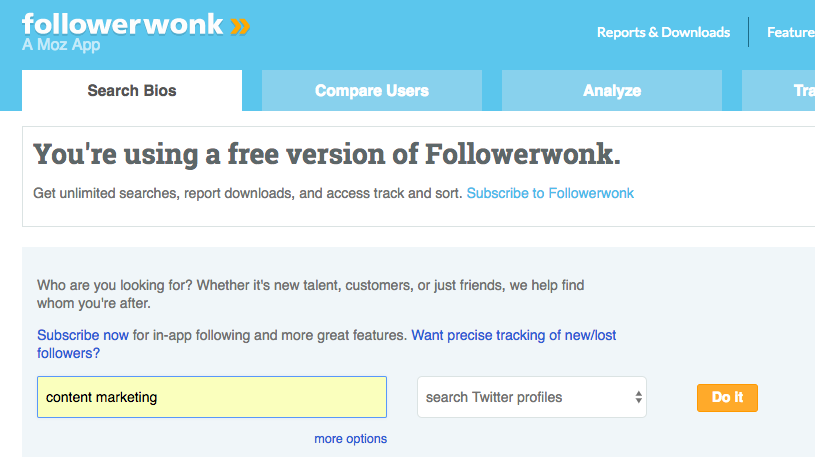
Followerwonk returns over 32,000 results:
Use the columns on the right side of the screen to filter the results by various criteria, including ‘Tweets’, ‘Followers’, and ‘Social Authority’:
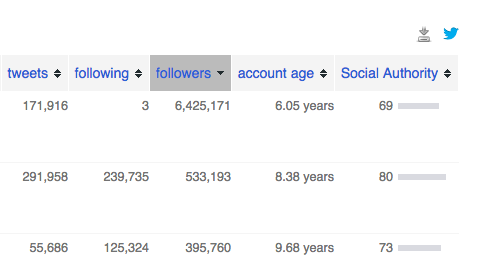
The only catch with the free account is you won’t be able to download the results.
But it’s still a great way to identify Influencers in your niche.
2.3 Look for Previous Roundups
A quick and easy way to find Influencers is to simply look for previously published roundups on your topic.
The advantage of this method is you not only find experts in your niche, you find experts in your niche who like participating in roundups.
Just go to Google and type in any of the following strings:
- experts reveal “keyword”
- experts top tips “keyword”
- experts best tips “keyword”
- experts offer “keyword”
- experts predictions “keyword”
Click on the search results one by one and build up a database of experts who have participated in previous roundups in your niche.
3. Finding email addresses
Although most people now have contact forms on their websites you’d be surprised how often you can find someone’s email address on their contact page, usually disguised by replacing @ with [at].
3.1 Use an Email Finding Service
But if you can’t find their email address anywhere, there are various email finding services, such as:
- AnyMailFinder
- ClearBit (Chrome Extension)
- LeadGibbon
- Hunter.io
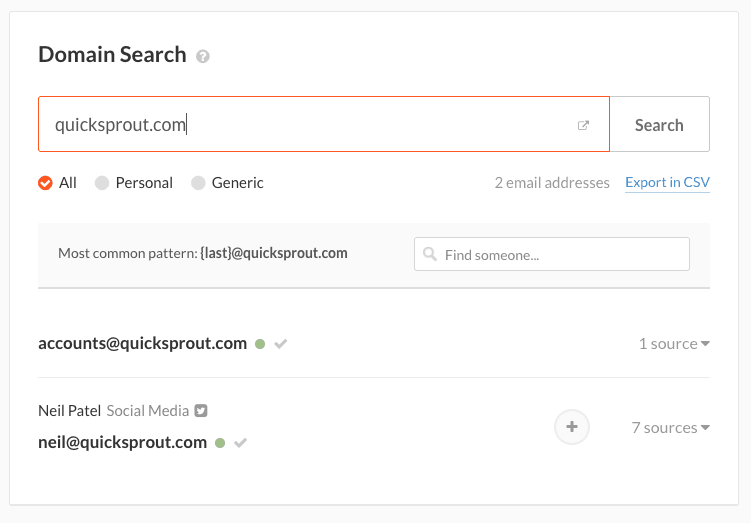
The service I’ve had best results with is Hunter, which gives you 150 free searches a month. That’s enough to do a couple of roundups a month!
Just type the domain name into Hunter and it will usually give you at least a couple of verified email addresses:
3.2 Sign up to their Newsletter
If that fails you can always sign up to their newsletter. Most bloggers use their personal email address in the header of the confirmation email (i.e. name@domain.com).
It’s a good practice, in any case, to sign up to the expert’s Newsletter, as that’s another way of getting on their radar.
In the welcome email, Influencers often reach out to new subscribers, asking them what issues they are struggling with. That’s a great opportunity to drop them an email and introduce yourself.
4. Doing the Outreach
Outreach is where you’ll do the bulk of the work involved in putting together a roundup.
4.1 Use an Online Form
An online form makes it really easy for your experts to respond. It also makes it very clear-cut what is required. An online form will make you appear business-like and show that you know what you’re doing.
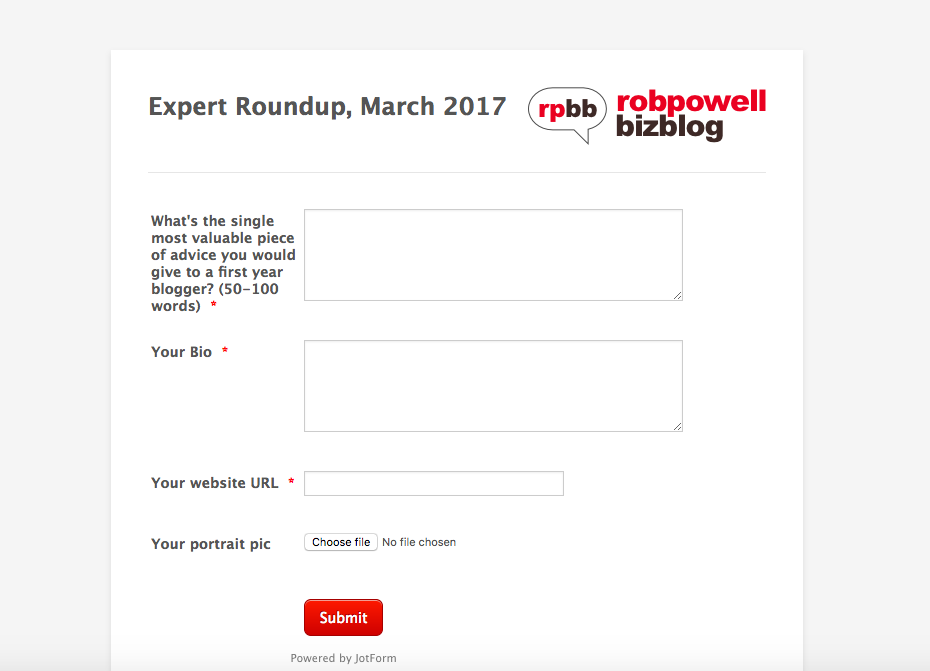
There are four bits of information you want to collect in the online form:
- The expert’s response to the question
- The expert’s Bio
- The expert’s URL
- The expert’s portrait pic (also called a headshot)
I use Jotform as it’s the only free online form that allows the user to upload a photo (Google Forms used to allow uploads, but no longer).
Sign up to Jotform.com and create your form. Once your form is ready, click on ‘Publish’:
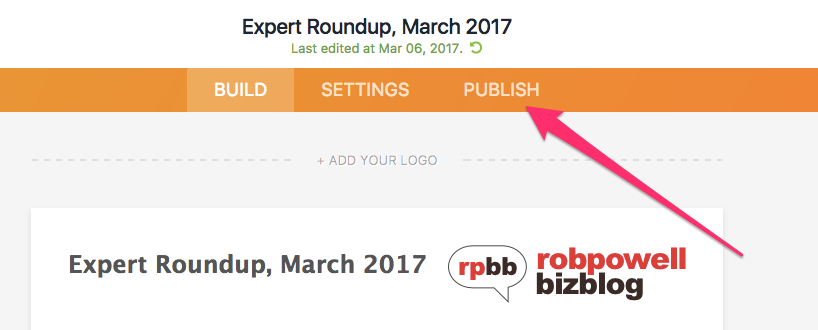
On the next screen, click on ‘Embed’:
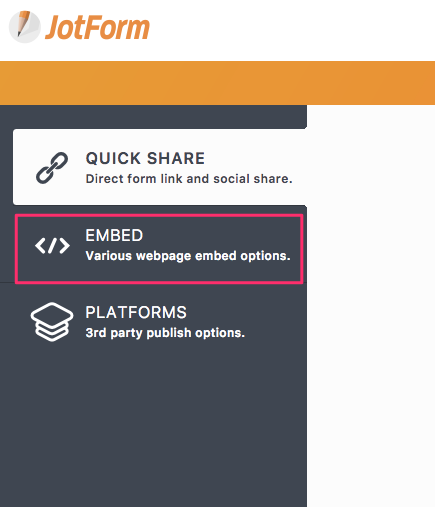
Then select the ‘Embed’ option and copy the code:
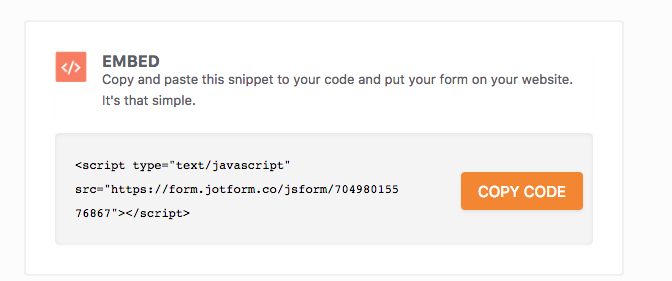
I create my forms on a WordPress page rather than a post because it gives me more control over the appearance.
Specifically, I want to:
- Put the form on a blank page without a right-hand sidebar
- Remove the Page Title from the top of the page
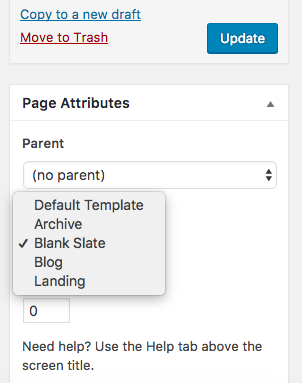
If your WP theme doesn’t allow you to create a totally blank page, download the Blank Slate plugin.
Create a new page and in the ‘Edit’ screen choose ‘Blank Slate’ (in the right sidebar):
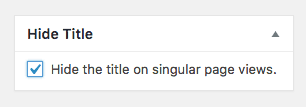
Then check the box next to ‘Hide Title’:
And that’s it! Your form will look something like this:
4.2 Make it Personal
Always begin your email with the expert’s name. Nothing will get your outreach email discarded quicker than a message that starts: “Hey there!”
4.3 Use the Principle of Reciprocity
It’s a basic law of human behaviour that people will give back or reciprocate a favour. In other words, do a favour for your expert and they’ll do one for you (i.e. contribute to your roundup post).
The way I do this is I look for a blog post of theirs that I really like, and then I tweet it to my followers. You can mention the tweet in your outreach email.
4.4 Template for the initial Outreach
As with the other templates in this article, please don’t copy it word for word. Find your own words and make it your own!
| Subject line: [NAME], I’d love to get your input for an article I’m writing
Hi [NAME], This is Rob Powell from www.robpowellbizblog.com. I’m a writer and online entrepreneur and I blog about writing and content marketing. I’ve seen your name around a lot lately so I decided to check out your site. I really liked this guest post about ________. Absolutely epic! I really liked your point about ____________________________. Anyway, I thought it was so good I just tweeted it to my followers. I’m putting together an article on tips from a select group of entrepreneurs, and I’d love to include you in that list. If you have time, here’s the question and a quick form that makes everything a bit easier: ——————————- The deadline to turn this in is ________. The post will be published in the following week and I’ll shoot you over a link to it when it’s live, if you choose to participate. I’ll include a 2 or 3-line Bio with a link back to your website. The online form has fields for your Bio, your website URL and an upload link for your photo. Just 50-100 words would be awesome. I’ve invited 30 other influential bloggers and I’ll be promoting the post heavily once it goes live. If you are too busy or it’s not a fit for your brand, I totally understand. That said, my audience would love to hear your insights. Hope to hear from you. All the best, |
Key Points in the Initial Outreach:
- Name of the Expert
- Introduce yourself
- You know their website
- You’ve read at least one of their blog posts
- You liked it because…
- You tweeted it to your followers
- The Roundup Question plus link to the online form
- The deadline (people put things off without a deadline)
- A two-line bio with a link back to their website
- 50 to 100 words would be great
- You have invited other experts to contribute
- You’ll be promoting it once it is published
- If they don’t have time or the question doesn’t fit with their focus, it’s totally fine.
4.5 Include Contributing Experts in your Outreach Email
Once you have responses from 5 experts, include their names and websites in your outreach email.
The psychology of this is that your prospects are more likely to want to participate if they see names they recognize. People don’t want to be left out:
Other experts who have already contributed to my roundup post are:
|
4.6 Specify a Deadline
Specify a deadline of no more than 7 days away. You want people to take action now. If you don’t give a deadline, or if you give them too long, it will go on the backburner and they’ll forget about it.
4.7 Thank Responders within 24 hours
Thank the experts who respond with a simple email, within 24 hours:
| Subject line: [NAME], thanks so much for your input into my roundup article
Hi [NAME], Thanks so much for that! I’ll keep you posted and will send you a link as soon as the article is live. All the best, |
4.8 Keep Track of your Outreach
Use a spreadsheet to keep track of who you emailed and who responded. You’ll need this to:
- Avoid emailing the same expert twice
- Send a ‘thank you email’ to all the experts who responded
- Send an email once the article is live, asking the expert to share
In my spreadsheet I include a column containing the link to the expert’s article that I tweeted to my followers, as this is information I will need while composing the outreach email.
4.9 Get Noticed by the Expert
When you’re starting out and are completely unknown, it can be hard to get experts to respond. You need to do everything you can to get on their radar.
One way to do this is to follow them on Twitter and another way is to sign up to their Newsletter.
In either case, they may or may not see your name and take note. But either way, it increases your chances of getting a response to your outreach.
5. Writing the Article
5.1 Analyse and Summarize the Responses
You might think that the main advantage of roundup posts is that you get your article written for you. That’s certainly true. But you still need to do your own analysis and summary of what the experts have said.
A roundup post that just presents the responses of the experts and nothing more is very weak.
One of the reasons you need to analyse and summarize what the experts have said is that your readers may not have time to read the whole article – they just want to get the key takeaways in a nutshell.
So at the end of your roundup post, always include your analysis and summary of what the experts have said.
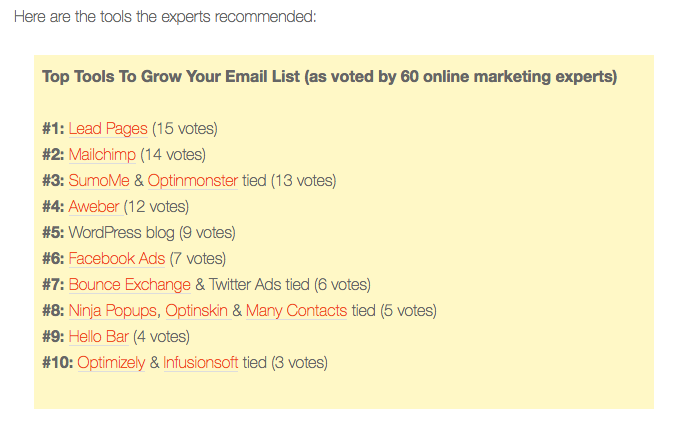
If your roundup asked a ‘top three’ question (e.g. What are your top three Productivity tools?), the analysis is very simple. You just add up the responses and create a ‘top 10’ leader board. Here’s an example from Robbie Richard’s article, 60 Experts Reveal Top 3 Tools To Grow Your Email List:
If the roundup question is not a list-type but asks for an opinion, then the analysis will be bit more involved. But nothing scary!
Just go through the responses and see what the main points are.
Often there will be overlap in the responses. For example, you might have 19 experts who made 11 points.
Create a sub-heading for each point and summarize the point in no more than 3 or 4 sentences. That’s all you need to do!
5.2 Provide a Summary at the Beginning
At the beginning of your roundup post include a brief summary of the key takeaways. This is for readers who are just skimming and want to see the nutshell version.
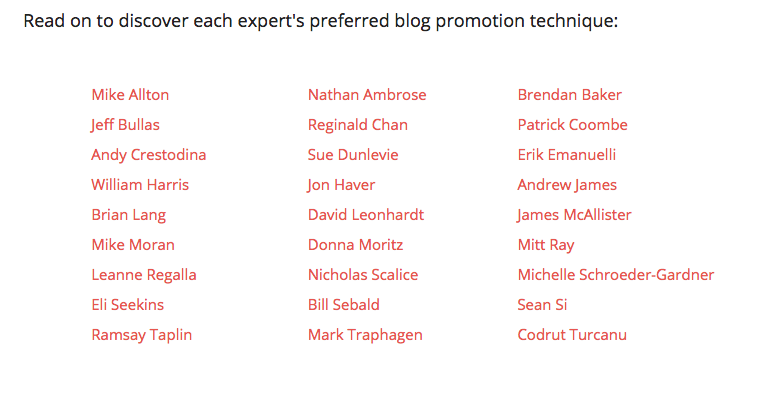
5.3 Table of Hyperlinked Names
At the start of the your roundup, insert a table of hyperlinked expert names so that readers can quickly navigate to individual responses:
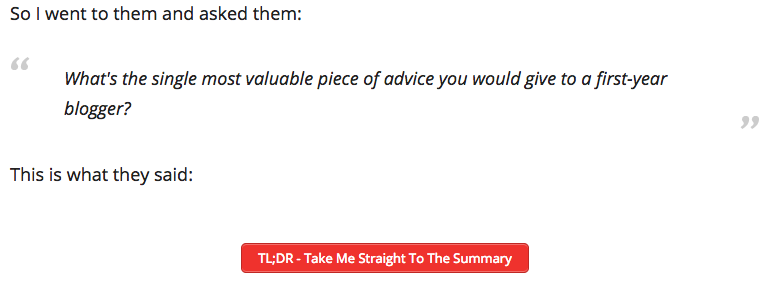
5.4 Include a TL;DR button
Most people who read blog posts are in a rush. They just want to get the gist of it quickly. For these readers it’s very helpful to provide a button near the top of the article that takes them straight to the analysis and summary:
5.5 Include Portrait Pics
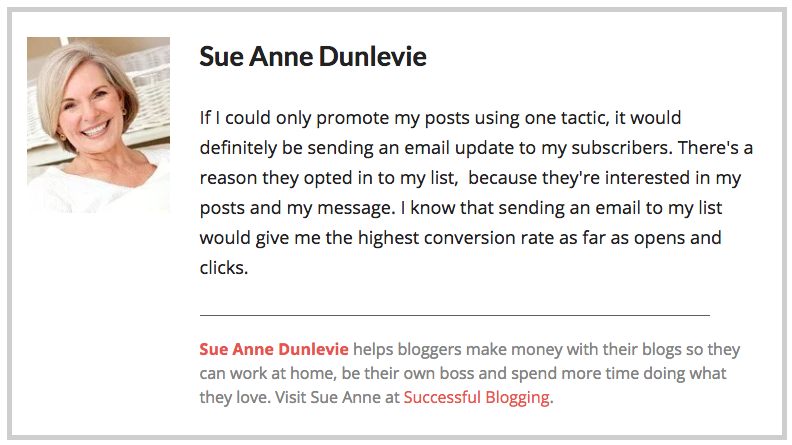
Images are vital in any post, as a way of breaking up the text. A portrait pic of your expert is too good an opportunity to miss. Always include a headshot next to the name of your expert:
5.6 Affiliate Links
Roundup posts that ask experts for their ‘top three tools’ for doing something can become evergreen content that will deliver a steady stream of traffic from organic search.
Include some affiliate links and your roundup could bring you a handy stream of passive income for years to come.
5.7 Create a Photo Collage
Images make any blog post more engaging and more shareable and what better image to use in a roundup post than a photo collage of the contributing experts?
There are various online services you can use to create a photo collage, some free (e.g. canva.com) and some paid (e.g. picmonkey.com).
But the easiest way to create a photo collage for a roundup post is Picasa. Although Google has officially retired Picasa you can still download it at: http://picasa.en.downloadastro.com/download/
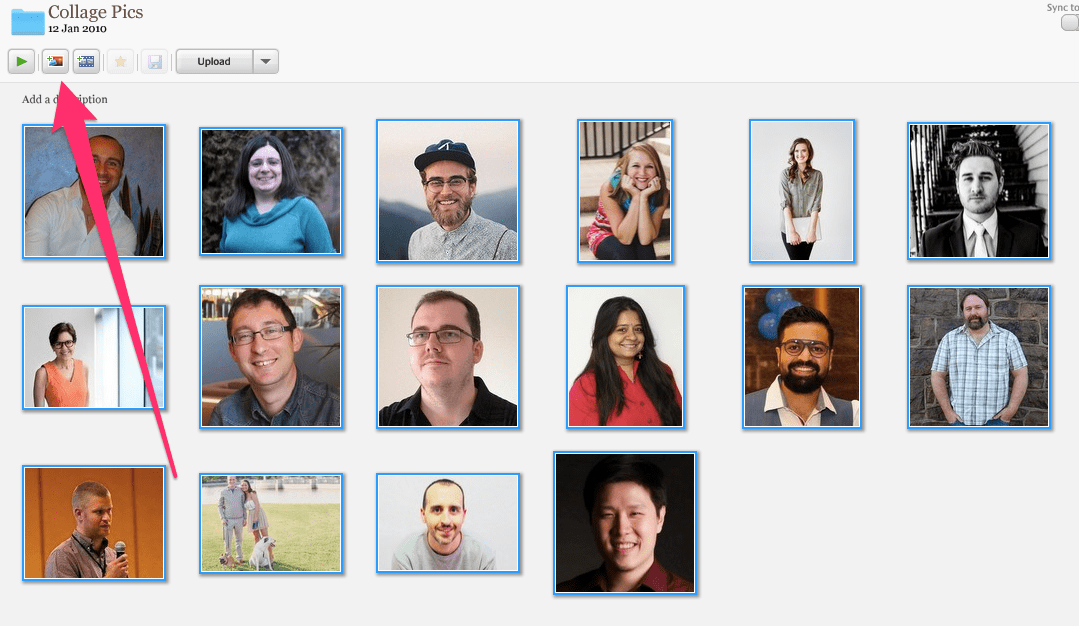
Open Picasa and use the left side panel to navigate to the folder where your portrait pics are located.
The following portrait pics are from my most recent roundup post, 19 Experts Reveal Their Top Tips For First Year Bloggers.
Select all the images in your folder and then click on the ‘Make Collage’ button (second from left):
Then, in the left side pane, use the ‘Grid Spacing Slider’ to adjust the margins between the photos. Then click ‘Create Collage’:

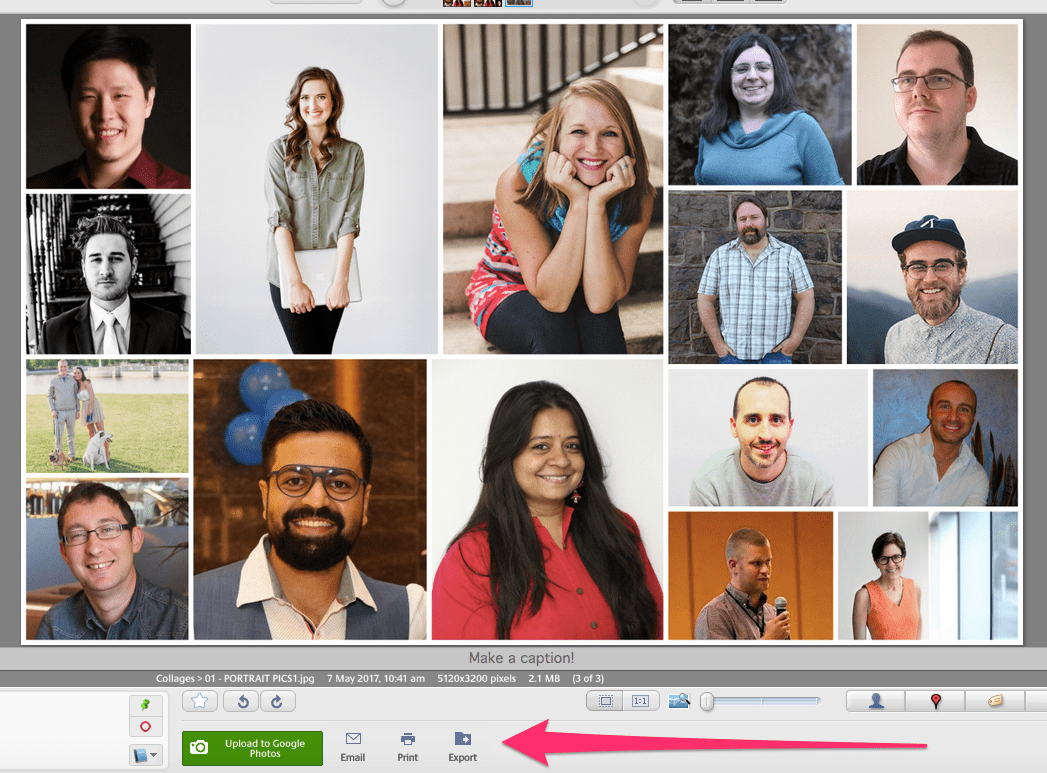
On the next window, click the ‘Export’ button at the bottom of the screen:
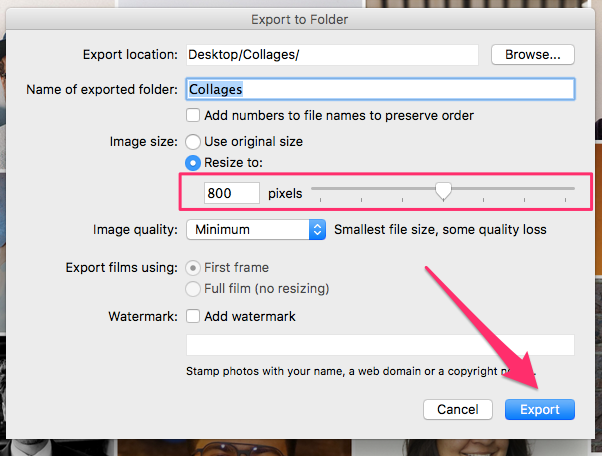
On the next screen, make sure the resize slider is set to 800 pixels, and then click ‘Export’:
With some of the online collage making services you’re either limited to a set number of photos per collage or you’ll be left with a grid containing empty spaces. What I like about the Picasa Collage Maker is that it fits the photos to the available space:

5.8 Include an Infographic
Including an Infographic in your Roundup post is one of the factors that will make your post go viral.
To prove my point, let me give you a little case study.
I published two roundup posts. Roundup ‘A’ had 27 contributors, while Roundup ‘B’ had 19 contributors.
Which one do you think got more shares?
You probably guessed Roundup ‘A’ – with 27 experts sharing it with their followers, it had a far greater audience reach than the first.
But it was the other way around.
Roundup ‘A’ received a total of 87 social media shares, while Roundup ‘B’ got 314 shares.
Not only that, but Roundup ‘B’ has gone viral: it’s been weeks since it received any active promotion from either me or the contributors, but every week it gets 10 to 20 new shares:

What made the difference? An Infographic!

The above Infographic was created using a vector graphics app called SketchApp, but there are plenty of online drag-and-drop Infographic makers:
- https://www.canva.com/create/infographics/
- https://piktochart.com/
- https://venngage.com/
- https://www.easel.ly/create
- https://www.visme.co/
- https://infogr.am/
Here’s a good tutorial on how to create an Infographic using Canva:
5.9 Thank the Experts
Somewhere in your roundup you should thank the experts for their time.
I usually do it at the end of the post, just before the summary. Here’s an example:
5.10 Include the Number of Experts in the Title
It’s been proven over and over again that numbers in the title get more clicks, so always include the number of experts in your title: “27 Experts Reveal Their Top Tips For First Year Bloggers”.
For some reason odd numbers attract more attention than even numbers so if you end up with an even number of experts, try and get just one more expert!
6. Promoting the Article
It’s true that roundup articles are self-promoting: the experts who contributed to the article share it out to their followers on social media. That’s one of reasons roundups are so powerful.
But there are some things you can do to make it easier for your contributors to spread the word:
6.1 Template for the Promotion Email
As soon as the roundup is live, send out an email asking the contributors to share it to their followers:
| Hi [NAME],
Thanks again for your great contribution to my expert roundup. The post is now live and you can view it here: If you have a moment, could you share it out? I’d be so grateful! Thanks once again. Best regards, |
6.2 Just Hit Reply
With your promotion email, no need to create a new subject line. Just go back to the email where the expert gave their response, and hit ‘reply’.
The reason for this?
When the expert sees that your email is a reply to their email, they are much more likely to open it.
6.3 Sprinkle ‘Ready-to-Tweet’ quotes
Sprinkle the completed article with ‘ready-to-tweet’ excerpts or quotes. This makes it easier for your experts to Tweet the post to their followers.
Ideally, include a ‘ready-to-Tweet’ quote for each expert.
I use the Social Warfare app for this, but there are many other options such as ClickToTweet (which is free).

6.4 Floating Social Media Buttons
Floating social media buttons are the panel of buttons that follow you as you move down a web page.
They’ve been shown to dramatically increase the number of shares on social media, so make sure you have this installed before your article goes live.
You want to do everything you can to help your experts share out the article to their followers.
I use the Social Warfare plugin but there are several other options:
7. Start Writing!
A roundup post is one of the most powerful blogging techniques available.
If you’re in your first year of blogging, or if you’ve been blogging for longer but haven’t been able to get any traction, roundup posts can take you to the next level.
Here’s a little known secret about successful blogging – it’s as much about connections as it is about content. And roundups are a brilliant way to make those connections.
My first, second, and third guest post opportunities were all direct results of a roundup post.
Do three or four roundups and you’ll have a perfect platform to launch yourself into guest posting. But roundups do require some solid work, mainly in the outreach stage.
Here again are the 6 key steps in producing a successful roundup:
- Deciding on the Question
- Finding the Experts
- Finding Email Addresses
- Doing the Outreach
- Writing the Article
- Promoting the Article
And remember, the more experts you have on your panel, the more audience reach you’ll have. Get enough experts involved and you may well have a roundup that goes viral!
Let me know how you go in the comments below.
I’d love to hear your experiences with roundup posts!

